
Introduction:
Breakout is a classic arcade game developed by Atari, released in 1976. The game features a paddle controlled by the player, which is used to bounce a ball to break a wall of bricks at the top of the screen. The player’s objective is to clear all the bricks from the screen by deflecting the ball with the paddle, preventing it from falling below the paddle and out of play.
In the game, the ball bounces off the walls and bricks, breaking them upon collision. Some bricks may require multiple hits to break, and others may contain power-ups that provide various benefits to the player, such as increasing the paddle size, adding additional balls, or granting extra lives.
If the player misses the ball with the paddle and it falls below the paddle, they lose a life. The game ends when the player successfully clears all the bricks from the screen or runs out of lives.
Programming a Breakout game using Python has several advantages:
Ease of Learning and Use: Python is known for its simplicity and readability, making it an excellent choice for beginners and experienced developers alike. Its straightforward syntax and extensive libraries, such as Pygame, allow developers to quickly build and prototype games.
Pygame Library: Pygame is a popular library for creating 2D games in Python. It provides modules for handling graphics, sound, input, and more, which simplifies the game development process. Pygame’s documentation and community support make it easy to find resources and solutions to common problems.
Cross-Platform Compatibility: Python is a cross-platform language, meaning that games developed with Python can run on multiple operating systems, including Windows, macOS, and Linux. This allows developers to reach a broader audience without significant modifications to the code.
Rapid Prototyping: Python’s high-level nature and dynamic typing allow for rapid prototyping of game ideas. Developers can quickly implement game mechanics, test gameplay, and iterate on designs, speeding up the development process.
Abundance of Resources: Python has a vast ecosystem of resources, tutorials, and community forums dedicated to game development. Developers can easily find tutorials, guides, and example code to help them learn and improve their game development skills.
Integration with Other Libraries and Tools: Python can easily integrate with other libraries and tools, expanding its capabilities. For example, developers can use libraries like NumPy for mathematical operations, OpenCV for computer vision tasks, or TensorFlow for machine learning, enhancing their games with advanced features.
Support for Object-Oriented Programming: Python’s support for object-oriented programming (OOP) allows developers to organize their code into classes and objects, making it easier to manage and maintain large game projects.
Community and Open Source: Python has a large and active community of developers who contribute to open-source projects, including game development libraries and frameworks. This community support fosters collaboration, innovation, and the sharing of knowledge, benefiting developers of all skill levels.
Overall, Python’s simplicity, versatility, and strong community support make it an excellent choice for programming a Breakout game and other 2D games.
All my game creation examples provide full source code, assuming the reader has basic knowledge of programming concepts in Python. This includes understanding variables, loops, conditionals, functions, and basic object-oriented programming (OOP) concepts like classes and objects.
While the code is explained with comments, it’s expected that you has a grasp of Python syntax and the ability to follow along. Topics covered include initializing Pygame, setting up the game window, handling events, drawing shapes and images, collision detection, basic physics simulation, game logic, and object-oriented programming.
Additionally, you should be comfortable with debugging and troubleshooting common issues in game development, as well as testing and refining the game for a smooth gameplay experience.
Overall, the provided source code assumes a basic level of Python proficiency and serves as a practical demonstration of how to implement a variety of game features using the Pygame library.
What You Need To Know

Before programming a Breakout game in Python, it’s helpful to have a good understanding of the following concepts and technologies:
Python Programming: Ensure you have a solid understanding of Python programming fundamentals, including data types, control structures (loops and conditionals), functions, and object-oriented programming (classes and objects).
Pygame Library: Familiarize yourself with Pygame, a set of Python modules designed for game development. Understand how to install Pygame, create a game window, handle events (such as keyboard and mouse input), draw shapes and images, and manage game states (e.g., start screen, game over screen).
2D Graphics: Understand the basics of 2D graphics, including concepts like coordinates, shapes (rectangles, circles), and collision detection. You’ll need to know how to draw objects on the screen, move them, and detect when they collide.
Game Development Basics: Have a general understanding of game development concepts, such as game loops, frame rate, game states, and game mechanics. Know how to structure your code to manage game flow and logic efficiently.
Sprites and Animation: Learn how to work with sprites (2D images used in games) and create animations. Breakout involves moving objects (paddle, ball, bricks), so understanding how to animate these objects smoothly is essential.
Collision Detection: Understand how to detect collisions between game objects. In Breakout, you need to detect when the ball collides with the paddle, bricks, or screen boundaries and react accordingly.
Game Physics: Have a basic understanding of game physics, including velocity, acceleration, and gravity. In Breakout, you’ll need to calculate the ball’s trajectory and how it bounces off objects.
User Input Handling: Know how to handle user input from the keyboard or mouse. In Breakout, you’ll use keyboard input to move the paddle left and right.
Basic Math: Understand basic mathematical concepts such as vector operations, trigonometry (for angles and rotations), and simple physics calculations. These are essential for determining object positions, directions, and velocities.
Game Design: Have a grasp of game design principles, including game mechanics, player interactions, difficulty balancing, and visual aesthetics. Breakout requires designing levels with various brick configurations and considering factors like paddle speed and ball velocity.
Debugging and Problem Solving: Develop problem-solving skills and learn how to debug code effectively. Debugging is crucial for identifying and fixing errors and issues in your game.
By mastering these concepts and skills, you’ll be well-equipped to tackle the development of a Breakout game in Python using Pygame. Start with smaller projects to practice these skills before diving into the Breakout game development.
Graphic Game

You can take a look below at how our BreakOut Game will look like when executed on Pycharm.
Executing The Code On Pycharm
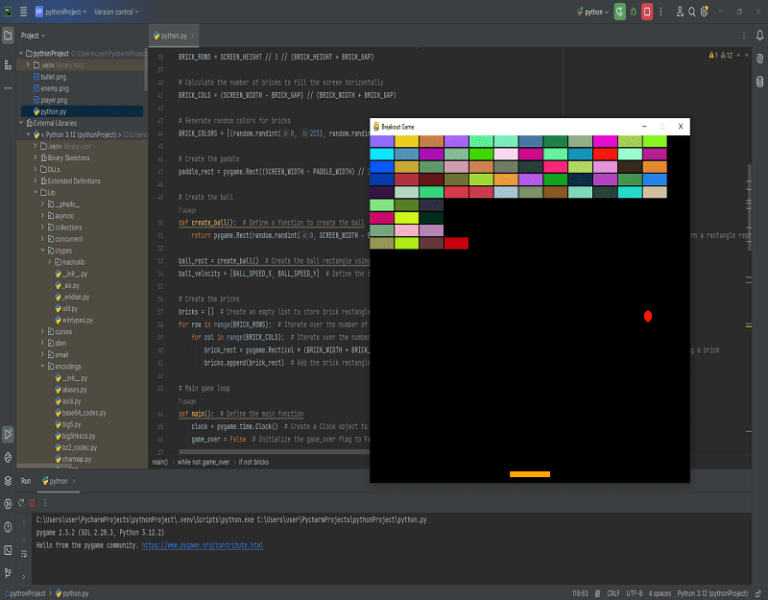
Now it is time to execute the code and see how it look like. We will use Pycharm for this purpose and all you have to do it to copy paste the code below and click on the button Run. If you correctly installed Pycharm, you should be able to see the Pong Game dsplaying on the screen.
To execute a Python code in PyCharm, follow these steps:
Open PyCharm: Start by opening the PyCharm IDE on your computer.
Create or Open a Project: If you already have a project, open it; otherwise, create a new project by clicking on “File” -> “New Project”. Choose a location for your project and configure any project settings as needed.
Create a Python File: Inside your project, create a new Python file where you’ll write your code. You can do this by right-clicking on the project folder in the project explorer, then selecting “New” -> “Python File”. Give your file a name.
Write Your Python Code: Open the Python file you created and write your Python code in it. You can write any Python code, including the code for your Pong game.
Configure Run Configuration (Optional): PyCharm allows you to configure run configurations to run your Python code with specific settings. To configure a run configuration, click on “Run” -> “Edit Configurations”. Here, you can specify the Python interpreter, command-line arguments, working directory, and other settings. For simple scripts, PyCharm will automatically create a run configuration for you.
Run Your Code: Once you’ve written your code, you can run it by clicking on the green “Run” arrow icon in the top-right corner of the PyCharm window. Alternatively, you can use the shortcut Ctrl + Shift + F10 (Cmd + Shift + F10 on Mac). PyCharm will execute your Python code, and you’ll see the output in the “Run” tool window at the bottom of the screen.
View Output: If your code produces any output (e.g., print statements), you’ll see it in the “Run” tool window. You can also set breakpoints in your code to pause execution and inspect variables using the debugger.
Debug Your Code (Optional): PyCharm provides a powerful debugger that allows you to step through your code, inspect variables, and analyze program behavior. You can start debugging by clicking on the bug icon next to the run button or by using the shortcut Ctrl + Shift + F9 (Cmd + Shift + F9 on Mac).
That’s it! You’ve successfully executed your Python code in PyCharm. If there are any errors or issues, PyCharm will display them in the “Run” tool window, allowing you to debug and fix them.
Code Complete
import pygame  # Import the pygame module
import sys  # Import the sys module
import random  # Import the random module

# Initialize Pygame
pygame.init()  # Initialize Pygame

# Set up the screen
SCREEN_WIDTH = 800  # Set the width of the screen
SCREEN_HEIGHT = 600  # Set the height of the screen
screen = pygame.display.set_mode((SCREEN_WIDTH, SCREEN_HEIGHT))  # Create the game window
pygame.display.set_caption("Breakout Game")  # Set the title of the game window

# Define colors
BLACK = (0, 0, 0)  # Define the color black
WHITE = (255, 255, 255)  # Define the color white
BLUE = (0, 0, 255)  # Define the color blue
RED = (255, 0, 0)  # Define the color red
GREEN = (0, 255, 0)  # Define the color green
YELLOW = (255, 255, 0)  # Define the color yellow
PADDLE_COLOR = (255, 165, 0)  # Define the color orange for the paddle
BALL_COLOR = RED  # Define the color red for the ball

# Define game variables
PADDLE_WIDTH = 100  # Set the width of the paddle
PADDLE_HEIGHT = 10  # Set the height of the paddle
PADDLE_SPEED = 8  # Set the speed of the paddle

BALL_RADIUS = 10  # Set the radius of the ball
BALL_SPEED_X = 5  # Set the horizontal speed of the ball
BALL_SPEED_Y = -5  # Set the vertical speed of the ball

BRICK_WIDTH = 60  # Set the width of a brick
BRICK_HEIGHT = 20  # Set the height of a brick
BRICK_GAP = 2  # Set the gap between bricks

# Calculate the number of bricks to fill one-third of the screen vertically
BRICK_ROWS = SCREEN_HEIGHT // 3 // (BRICK_HEIGHT + BRICK_GAP)

# Calculate the number of bricks to fill the screen horizontally
BRICK_COLS = (SCREEN_WIDTH - BRICK_GAP) // (BRICK_WIDTH + BRICK_GAP)

# Generate random colors for bricks
BRICK_COLORS = [(random.randint(0, 255), random.randint(0, 255), random.randint(0, 255)) for _ in range(BRICK_ROWS * BRICK_COLS)]

# Create the paddle
paddle_rect = pygame.Rect((SCREEN_WIDTH - PADDLE_WIDTH) // 2, SCREEN_HEIGHT - PADDLE_HEIGHT - 10, PADDLE_WIDTH, PADDLE_HEIGHT)

# Create the ball
def create_ball():  # Define a function to create the ball
    return pygame.Rect(random.randint(0, SCREEN_WIDTH - BALL_RADIUS * 2), random.randint(0, SCREEN_HEIGHT // 2), BALL_RADIUS * 2, BALL_RADIUS * 2)  # Return a rectangle representing the ball's position and size

ball_rect = create_ball()  # Create the ball rectangle using the create_ball function
ball_velocity = [BALL_SPEED_X, BALL_SPEED_Y]  # Define the initial velocity of the ball

# Create the bricks
bricks = []  # Create an empty list to store brick rectangles
for row in range(BRICK_ROWS):  # Iterate over the number of rows
    for col in range(BRICK_COLS):  # Iterate over the number of columns
        brick_rect = pygame.Rect(col * (BRICK_WIDTH + BRICK_GAP), row * (BRICK_HEIGHT + BRICK_GAP), BRICK_WIDTH, BRICK_HEIGHT)  # Create a rectangle representing a brick
        bricks.append(brick_rect)  # Add the brick rectangle to the bricks list

# Main game loop
def main():  # Define the main function
    clock = pygame.time.Clock()  # Create a Clock object to control the frame rate
    game_over = False  # Initialize the game_over flag to False

    while not game_over:  # Main game loop
        # Event handling
        for event in pygame.event.get():  # Loop through all events
            if event.type == pygame.QUIT:  # Check if the user clicked the close button
                pygame.quit()  # Quit Pygame
                sys.exit()  # Exit the program

        # Move the paddle
        keys = pygame.key.get_pressed()  # Get a list of currently pressed keys
        if keys[pygame.K_LEFT] and paddle_rect.left > 0:  # Check if the left arrow key is pressed and the paddle is not at the left edge of the screen
            paddle_rect.move_ip(-PADDLE_SPEED, 0)  # Move the paddle to the left
        if keys[pygame.K_RIGHT] and paddle_rect.right < SCREEN_WIDTH:  # Check if the right arrow key is pressed and the paddle is not at the right edge of the screen
            paddle_rect.move_ip(PADDLE_SPEED, 0)  # Move the paddle to the right

        # Move the ball
        ball_rect.move_ip(ball_velocity[0], ball_velocity[1])  # Move the ball based on its velocity

        # Ball collision with walls
        if ball_rect.left < 0 or ball_rect.right > SCREEN_WIDTH:  # Check if the ball hits the left or right wall
            ball_velocity[0] = -ball_velocity[0]  # Reverse the horizontal velocity of the ball
        if ball_rect.top < 0:  # Check if the ball hits the top wall
            ball_velocity[1] = -ball_velocity[1]  # Reverse the vertical velocity of the ball

        # Ball collision with paddle
        if ball_rect.colliderect(paddle_rect):  # Check if the ball collides with the paddle
            ball_velocity[1] = -ball_velocity[1]  # Reverse the vertical velocity of the ball
            offset = ball_rect.centerx - paddle_rect.centerx  # Calculate the offset between the ball's center and the paddle's center
            ball_velocity[0] = offset / (PADDLE_WIDTH / 2) * BALL_SPEED_X  # Adjust the horizontal velocity based on the offset

        # Ball collision with bricks
        for brick in bricks[:]:  # Iterate over a copy of the bricks list
            if ball_rect.colliderect(brick):  # Check if the ball collides with a brick
                bricks.remove(brick)  # Remove the brick from the list of bricks
                ball_velocity[1] = -ball_velocity[1]  # Reverse the vertical velocity of the ball

        # Game over if ball passes through the paddle
        if ball_rect.top > SCREEN_HEIGHT:  # Check if the ball goes past the paddle
            game_over = True  # Set the game_over flag to True

        # Draw everything
        screen.fill(BLACK)  # Fill the screen with black color
        pygame.draw.rect(screen, PADDLE_COLOR, paddle_rect)  # Draw the paddle
        pygame.draw.circle(screen, BALL_COLOR, ball_rect.center, BALL_RADIUS)  # Draw the ball
        for brick, color in zip(bricks, BRICK_COLORS):  # Loop through bricks and their corresponding colors
            pygame.draw.rect(screen, color, brick)  # Draw each brick with its respective color

        pygame.display.flip()  # Update the display
        clock.tick(60)  # Control the frame rate to 60 FPS

        # Check if all bricks are destroyed
        if not bricks:  # If there are no more bricks left
            game_over = True  # Set the game_over flag to True

    # Game over message
    font = pygame.font.Font(None, 36)  # Create a font object
    text = font.render("Game Over", True, WHITE)  # Render the text "Game Over"
    text_rect = text.get_rect(center=(SCREEN_WIDTH // 2, SCREEN_HEIGHT // 2))  # Get the rectangle of the text
    screen.blit(text, text_rect)  # Display the text on the screen
    pygame.display.flip()  # Update the display
    pygame.time.wait(2000)  # Wait for 2 seconds before quitting

    pygame.quit()  # Quit Pygame
    sys.exit()  # Exit the program

# Run the game
if __name__ == "__main__":  # Check if this module is being run as the main program
    main()  # Call the main function
Now you can copy paste the following code on Pycharm and run it. The game will be launched and you can begin to play but the goal is not to play the game, it is to create it! So i recommand you to try to fully understand how it works by continuing to read this page and then try to add more implementations from your own perspective.
Like you can see on the above code, i commented every line of the code so you can have a fully understanding of how things are going on. Later on, i extracted each part of the code and explain the main goals of each function.
Physical Concept Of The Game

The Breakout game incorporates several physical concepts that govern the behavior of objects within the game world. Here’s an explanation of these concepts:
Velocity and Speed: Velocity represents the rate of change of an object’s position over time, including both speed and direction. In Breakout, the ball and the paddle have velocities that determine how fast they move in a particular direction. The ball’s velocity determines how quickly it moves across the screen, while the paddle’s velocity controls its horizontal movement.
Acceleration: Acceleration is the rate of change of velocity. In Breakout, the ball’s acceleration may change when it collides with objects, such as the paddle or bricks. For example, when the ball collides with the paddle, its horizontal velocity might change, resulting in a different acceleration.
Gravity: While Breakout is typically played in a gravity-free environment, the concept of gravity can be applied to how objects move. For instance, if there were a gravity effect in the game, the ball would accelerate downwards over time, simulating the force of gravity pulling it down.
Friction and Inertia: Friction affects the movement of objects in contact with each other. In Breakout, there’s usually no friction between the ball and the paddle or bricks. However, friction can be simulated to alter the behavior of the ball when it collides with surfaces. Inertia refers to an object’s resistance to changes in its motion. For example, once the ball is in motion, it continues moving until it collides with an object or reaches the screen’s boundary, due to inertia.
Collision Detection and Response: Breakout relies heavily on collision detection to determine when objects, such as the ball, paddle, or bricks, collide with each other. When a collision occurs, the game calculates the appropriate response. For instance, when the ball collides with the paddle, its direction might change based on the point of impact. Similarly, when the ball hits a brick, the brick is destroyed, and the ball’s direction may change.
Reflection and Angles: When the ball collides with an object, it reflects off the object’s surface according to the law of reflection. The angle of incidence (the angle between the incoming ball’s trajectory and the normal of the surface) is equal to the angle of reflection (the angle between the outgoing ball’s trajectory and the normal of the surface). This principle is used in Breakout to calculate the ball’s new direction after a collision.
Energy Conservation: In Breakout, energy conservation principles apply when the ball collides with objects. For instance, when the ball hits the paddle, the total energy of the system (ball and paddle) is conserved, although the energy may redistribute between kinetic energy and potential energy (as the ball changes direction).
Understanding these physical concepts helps developers create more realistic and engaging gameplay experiences in Breakout by accurately simulating the behavior of objects within the game world.
You can take a look at this website to have a better understanding about the physical concept of the game https://www.winthrop.edu/uploadedFiles/ceshs/itc/CreatingBreakouts2.pdf
Algorithm Point Of View
Now let’s see how we can implement an algorithm for each concept we saw previoulsy before starting to evaluate the full code.
Velocity and Speed:
- Velocity describes the rate of change of an object’s position over time. In a game, you update the position of objects based on their velocities in each frame of the game loop.
# Update position based on velocity
position_x += velocity_x
position_y += velocity_y
- The algorithm updates the position of an object (e.g., a sprite, like a ball or a character) based on its velocity in both the x (horizontal) and y (vertical) directions. It simply adds the velocity to the current position to determine the new position.
Acceleration:
- Acceleration is the rate of change of velocity over time. It can speed up, slow down, or change the direction of an object’s motion.
# Modify velocity based on acceleration
velocity_x += acceleration_x
velocity_y += acceleration_y
- This algorithm updates the velocity of an object based on its acceleration in both the x and y directions. You add the acceleration to the current velocity in each frame, causing the object’s velocity to change over time.
Gravity:
- Gravity is a force that attracts objects towards each other. In a game, gravity typically pulls objects downward, affecting their vertical motion.
# Apply gravity to the vertical velocity
velocity_y += gravity- The algorithm applies gravity to the vertical velocity of an object. In each frame, it adds a constant value to the object’s vertical velocity, causing it to accelerate downward over time.
Friction and Inertia:
- Friction is a force that opposes motion between two surfaces in contact. Inertia is the tendency of an object to resist changes in its motion.
# Apply friction to slow down object
velocity_x *= friction
velocity_y *= friction
- This algorithm simulates friction and inertia by reducing the velocity of an object in both the x and y directions. It multiplies the current velocity by a friction coefficient (usually less than 1) to gradually slow down the object’s motion.
Collision Detection and Response:
- Collision detection determines whether two objects intersect. Collision response handles the outcome of the collision, such as changing velocities or positions to reflect the collision.
if object1.collides_with(object2):
    # Determine collision direction
    collision_direction = calculate_collision_direction(object1, object2)

    # Reflect velocity based on collision direction
    velocity_x, velocity_y = reflect_velocity(velocity_x, velocity_y, collision_direction)

    # Adjust positions to prevent overlap
    resolve_collision(object1, object2)
- The algorithm checks if two objects collide. If they do, it determines the direction of the collision and adjusts the velocities of the objects accordingly to simulate the bounce or impact.
Reflection and Angles:
- Reflection involves changing the direction of an object’s motion after a collision with a surface. The angle of incidence (angle of approach) equals the angle of reflection (angle of departure).
def reflect_velocity(velocity_x, velocity_y, collision_direction):
    # Reflect velocity based on collision direction
    if collision_direction == 'horizontal':
        velocity_y = -velocity_y
    elif collision_direction == 'vertical':
        velocity_x = -velocity_x
    elif collision_direction == 'diagonal':
        velocity_x = -velocity_x
        velocity_y = -velocity_y
    return velocity_x, velocity_y
- This algorithm reflects the velocity of an object based on the direction of the collision. It reverses the velocity in the direction perpendicular to the collision surface while maintaining the velocity parallel to the surface.
Energy Conservation:
- Energy conservation ensures that the total energy in a system remains constant before and after a collision. In a game, it ensures realistic interactions between objects.
def conserve_energy(velocity_x, velocity_y, collision_angle):
    # Calculate new velocities based on collision angle
    new_velocity_x = old_velocity_x * cos(collision_angle)
    new_velocity_y = old_velocity_y * sin(collision_angle)
    return new_velocity_x, new_velocity_y
These are simplified algorithms to illustrate the basic concepts. Actual implementations may require more complex calculations and additional considerations, especially for collision detection and response.
Initializing the Game
import pygame  # Import the pygame module
import sys  # Import the sys module
import random  # Import the random module

# Initialize Pygame
pygame.init()  # Initialize Pygame

# Set up the screen
SCREEN_WIDTH = 800  # Set the width of the screen
SCREEN_HEIGHT = 600  # Set the height of the screen
screen = pygame.display.set_mode((SCREEN_WIDTH, SCREEN_HEIGHT))  # Create the game window
pygame.display.set_caption("Breakout Game")  # Set the title of the game window
Now let’s start the explanation of the full code. We start by initializing Pygame and setting up the game screen.
Explanation:
pygame.init(): Initializes all imported Pygame modules. It needs to be called before using any other Pygame functions.screen_width = 800andscreen_height = 600: Define the width and height of the game window, respectively.screen = pygame.display.set_mode((screen_width, screen_height)): Creates the game window with the specified dimensions usingpygame.display.set_mode().pygame.display.set_caption("Breakout Game"): Sets the title of the game window to “Breakout Game” usingpygame.display.set_caption(). This is the text that appears on the title bar of the window.
Define Colors And Constants
# Define colors
BLACK = (0, 0, 0)  # Define the color black
WHITE = (255, 255, 255)  # Define the color white
BLUE = (0, 0, 255)  # Define the color blue
RED = (255, 0, 0)  # Define the color red
GREEN = (0, 255, 0)  # Define the color green
YELLOW = (255, 255, 0)  # Define the color yellow
PADDLE_COLOR = (255, 165, 0)  # Define the color orange for the paddle
BALL_COLOR = RED  # Define the color red for the ball

# Define game variables
PADDLE_WIDTH = 100  # Set the width of the paddle
PADDLE_HEIGHT = 10  # Set the height of the paddle
PADDLE_SPEED = 8  # Set the speed of the paddle

BALL_RADIUS = 10  # Set the radius of the ball
BALL_SPEED_X = 5  # Set the horizontal speed of the ball
BALL_SPEED_Y = -5  # Set the vertical speed of the ball

BRICK_WIDTH = 60  # Set the width of a brick
BRICK_HEIGHT = 20  # Set the height of a brick
BRICK_GAP = 2  # Set the gap between bricks
We define colors using RGB values and constants for paddle and brick properties such as size and speed.
Explanation:
Colors:
- BLACK: Defined as (0, 0, 0), representing the absence of color, typically used for backgrounds or outlines.
- WHITE: Defined as (255, 255, 255), representing full brightness, used for various elements including text and backgrounds.
- BLUE: Defined as (0, 0, 255), used for elements with a blue hue.
- RED: Defined as (255, 0, 0), used for elements with a red hue.
- GREEN: Defined as (0, 255, 0), used for elements with a green hue.
- YELLOW: Defined as (255, 255, 0), used for elements with a yellow hue.
- PADDLE_COLOR: Defined as (255, 165, 0), representing orange, specifically chosen for the paddle element.
- BALL_COLOR: Set to RED, indicating the color of the ball, typically used for defining the color of the game ball.
Game Variables:
- PADDLE_WIDTH: Set to 100, determines the width of the paddle in pixels.
- PADDLE_HEIGHT: Set to 10, determines the height of the paddle in pixels.
- PADDLE_SPEED: Set to 8, determines the speed of the paddle movement in pixels per frame.
- BALL_RADIUS: Set to 10, determines the radius of the ball in pixels.
- BALL_SPEED_X: Set to 5, determines the horizontal speed of the ball in pixels per frame.
- BALL_SPEED_Y: Set to -5, determines the vertical speed of the ball in pixels per frame. The negative value indicates the ball moves upward.
- BRICK_WIDTH: Set to 60, determines the width of a brick in pixels.
- BRICK_HEIGHT: Set to 20, determines the height of a brick in pixels.
- BRICK_GAP: Set to 2, determines the gap between bricks in pixels.
Paddle, Ball And Bricks Creation:
# Calculate the number of bricks to fill one-third of the screen vertically
BRICK_ROWS = SCREEN_HEIGHT // 3 // (BRICK_HEIGHT + BRICK_GAP)

# Calculate the number of bricks to fill the screen horizontally
BRICK_COLS = (SCREEN_WIDTH - BRICK_GAP) // (BRICK_WIDTH + BRICK_GAP)


# Generate random colors for bricks
BRICK_COLORS = [(random.randint(0, 255), random.randint(0, 255), random.randint(0, 255)) for _ in range(BRICK_ROWS * BRICK_COLS)]


# Create the paddle
paddle_rect = pygame.Rect((SCREEN_WIDTH - PADDLE_WIDTH) // 2, SCREEN_HEIGHT - PADDLE_HEIGHT - 10, PADDLE_WIDTH, PADDLE_HEIGHT)


# Create the ball
def create_ball():  # Define a function to create the ball
    return pygame.Rect(random.randint(0, SCREEN_WIDTH - BALL_RADIUS * 2), random.randint(0, SCREEN_HEIGHT // 2), BALL_RADIUS * 2, BALL_RADIUS * 2)  # Return a rectangle representing the ball's position and size

ball_rect = create_ball()  # Create the ball rectangle using the create_ball function
ball_velocity = [BALL_SPEED_X, BALL_SPEED_Y]  # Define the initial velocity of the ball

# Create the bricks
bricks = []  # Create an empty list to store brick rectangles
for row in range(BRICK_ROWS):  # Iterate over the number of rows
    for col in range(BRICK_COLS):  # Iterate over the number of columns
        brick_rect = pygame.Rect(col * (BRICK_WIDTH + BRICK_GAP), row * (BRICK_HEIGHT + BRICK_GAP), BRICK_WIDTH, BRICK_HEIGHT)  # Create a rectangle representing a brick
        bricks.append(brick_rect)  # Add the brick rectangle to the bricks list
Explanation:
Calculate Brick Rows and Columns:
- BRICK_ROWS: Calculated by dividing the screen height by 3 times the brick height plus the brick gap. This determines how many rows of bricks will fit in one-third of the screen vertically.
- BRICK_COLS: Calculated by dividing the available screen width (minus the gap) by the sum of brick width and brick gap. This determines how many columns of bricks will fit in the screen horizontally.
Generate Random Colors for Bricks:
- BRICK_COLORS: Created as a list comprehension iterating over a range determined by the total number of bricks (rows * columns). Each element in the list is a tuple representing a random RGB color generated using
random.randint().
- BRICK_COLORS: Created as a list comprehension iterating over a range determined by the total number of bricks (rows * columns). Each element in the list is a tuple representing a random RGB color generated using
Create the Paddle:
- paddle_rect: Defined as a
pygame.Rectobject using the coordinates calculated to position the paddle at the bottom center of the screen. It has a width ofPADDLE_WIDTHand a height ofPADDLE_HEIGHT.
- paddle_rect: Defined as a
Create the Ball:
- create_ball() function: Defines a function to create the ball rectangle. It returns a
pygame.Rectobject with a random position within the screen width and half of the screen height, with a size ofBALL_RADIUS * 2(diameter) for both width and height. - ball_rect: Created using the
create_ball()function, resulting in a rectangle representing the initial position and size of the ball. - ball_velocity: Initialized as a list with two elements, representing the initial horizontal and vertical speeds of the ball.
- create_ball() function: Defines a function to create the ball rectangle. It returns a
Create the Bricks:
- bricks list: Initialized as an empty list to store brick rectangles.
- Iterating through each row and column, a rectangle (
brick_rect) is created usingpygame.Rect(), with its position calculated based on the row and column index, and the size set toBRICK_WIDTHandBRICK_HEIGHT. These rectangles are then appended to thebrickslist.
Main Loop:
# Main game loop
def main():  # Define the main function
    clock = pygame.time.Clock()  # Create a Clock object to control the frame rate
    game_over = False  # Initialize the game_over flag to False

    while not game_over:  # Main game loop
        # Event handling
        for event in pygame.event.get():  # Loop through all events
            if event.type == pygame.QUIT:  # Check if the user clicked the close button
                pygame.quit()  # Quit Pygame
                sys.exit()  # Exit the program

        # Move the paddle
        keys = pygame.key.get_pressed()  # Get a list of currently pressed keys
        if keys[pygame.K_LEFT] and paddle_rect.left > 0:  # Check if the left arrow key is pressed and the paddle is not at the left edge of the screen
            paddle_rect.move_ip(-PADDLE_SPEED, 0)  # Move the paddle to the left
        if keys[pygame.K_RIGHT] and paddle_rect.right < SCREEN_WIDTH:  # Check if the right arrow key is pressed and the paddle is not at the right edge of the screen
            paddle_rect.move_ip(PADDLE_SPEED, 0)  # Move the paddle to the right

        # Move the ball
        ball_rect.move_ip(ball_velocity[0], ball_velocity[1])  # Move the ball based on its velocity

        # Ball collision with walls
        if ball_rect.left < 0 or ball_rect.right > SCREEN_WIDTH:  # Check if the ball hits the left or right wall
            ball_velocity[0] = -ball_velocity[0]  # Reverse the horizontal velocity of the ball
        if ball_rect.top < 0:  # Check if the ball hits the top wall
            ball_velocity[1] = -ball_velocity[1]  # Reverse the vertical velocity of the ball

        # Ball collision with paddle
        if ball_rect.colliderect(paddle_rect):  # Check if the ball collides with the paddle
            ball_velocity[1] = -ball_velocity[1]  # Reverse the vertical velocity of the ball
            offset = ball_rect.centerx - paddle_rect.centerx  # Calculate the offset between the ball's center and the paddle's center
            ball_velocity[0] = offset / (PADDLE_WIDTH / 2) * BALL_SPEED_X  # Adjust the horizontal velocity based on the offset

        # Ball collision with bricks
        for brick in bricks[:]:  # Iterate over a copy of the bricks list
            if ball_rect.colliderect(brick):  # Check if the ball collides with a brick
                bricks.remove(brick)  # Remove the brick from the list of bricks
                ball_velocity[1] = -ball_velocity[1]  # Reverse the vertical velocity of the ball

        # Game over if ball passes through the paddle
        if ball_rect.top > SCREEN_HEIGHT:  # Check if the ball goes past the paddle
            game_over = True  # Set the game_over flag to True

        # Draw everything
        screen.fill(BLACK)  # Fill the screen with black color
        pygame.draw.rect(screen, PADDLE_COLOR, paddle_rect)  # Draw the paddle
        pygame.draw.circle(screen, BALL_COLOR, ball_rect.center, BALL_RADIUS)  # Draw the ball
        for brick, color in zip(bricks, BRICK_COLORS):  # Loop through bricks and their corresponding colors
            pygame.draw.rect(screen, color, brick)  # Draw each brick with its respective color

        pygame.display.flip()  # Update the display
        clock.tick(60)  # Control the frame rate to 60 FPS

        # Check if all bricks are destroyed
        if not bricks:  # If there are no more bricks left
            game_over = True  # Set the game_over flag to True

    # Game over message
    font = pygame.font.Font(None, 36)  # Create a font object
    text = font.render("Game Over", True, WHITE)  # Render the text "Game Over"
    text_rect = text.get_rect(center=(SCREEN_WIDTH // 2, SCREEN_HEIGHT // 2))  # Get the rectangle of the text
    screen.blit(text, text_rect)  # Display the text on the screen
    pygame.display.flip()  # Update the display
    pygame.time.wait(2000)  # Wait for 2 seconds before quitting

    pygame.quit()  # Quit Pygame
    sys.exit()  # Exit the program

# Run the game
if __name__ == "__main__":  # Check if this module is being run as the main program
    main()  # Call the main function
Explanation:
Main Game Loop:
- main() function: This is the main function that runs the game.
- clock: A
pygame.time.Clockobject is created to control the frame rate. - game_over: A boolean variable initialized to
Falseto control the main game loop.
Event Handling:
- The loop iterates through all the events (like keyboard and mouse events) that Pygame detects.
- If the event type is
pygame.QUIT, which means the user clicked the window close button, Pygame quits and the program exits.
Moving the Paddle:
- It checks if the left or right arrow keys are pressed (
pygame.K_LEFTandpygame.K_RIGHT) and moves the paddle accordingly, ensuring it does not move beyond the screen boundaries.
- It checks if the left or right arrow keys are pressed (
Moving the Ball:
- Updates the position of the ball based on its velocity.
Ball Collision with Walls:
- Checks if the ball hits the left, right, or top walls of the screen. If so, it reverses the corresponding velocity component.
Ball Collision with Paddle:
- Detects if the ball collides with the paddle using
colliderect(). - If there’s a collision, it reverses the vertical velocity of the ball and adjusts its horizontal velocity based on where it hit the paddle.
- Detects if the ball collides with the paddle using
Ball Collision with Bricks:
- Iterates through each brick and checks if the ball collides with it.
- If a collision occurs, the brick is removed from the list, and the ball’s vertical velocity is reversed.
Game Over Condition:
- If the ball passes the paddle (falls off the screen), the
game_overflag is set toTrue, ending the game loop.
- If the ball passes the paddle (falls off the screen), the
Drawing:
- Clears the screen with a black color.
- Draws the paddle, ball, and bricks on the screen using
pygame.draw.rect()andpygame.draw.circle(). - Bricks are drawn with colors from the
BRICK_COLORSlist. - Updates the display with
pygame.display.flip().
Frame Rate Control:
- Limits the frame rate to 60 frames per second with
clock.tick(60).
- Limits the frame rate to 60 frames per second with
Game Over Message:
- Renders and displays the “Game Over” message at the center of the screen.
- Pauses for 2 seconds (
pygame.time.wait(2000)) before quitting the game.
Run the Game:
- Checks if the module is being run as the main program.
- If so, calls the
main()function to start the game loop.
Conclusion
We’ve successfully created a Breakout game using Python and Pygame. Here’s what we accomplished:
Setting Up: We initialized Pygame, defined colors, and set up the game window with a specified width and height.
Game Elements: We defined variables for the paddle, ball, and bricks, including their sizes, speeds, and colors.
Game Logic:
- Implemented the main game loop to handle events, move the paddle and ball, and check for collisions.
- Managed collisions with walls, paddle, and bricks.
- Set up game-over conditions when the ball falls off the screen or when all bricks are destroyed.
Drawing: We drew the paddle, ball, and bricks on the screen, updating their positions every frame.
Gameplay Features: We allowed player control over the paddle using the left and right arrow keys.
Game Over: Displayed a “Game Over” message when the game ends and provided an option to restart by closing and reopening the game window.
Frame Rate Control: We maintained a steady frame rate of 60 frames per second to ensure smooth gameplay.
Randomization: Randomized the position and color of the bricks, providing variability in gameplay.
Modularity: We organized the code into functions and used parameters for better code readability and maintainability.
Conclusion: By creating this Breakout game, we’ve demonstrated fundamental concepts of game development, including event handling, collision detection, drawing, and game state management.
Overall, this project serves as a solid foundation for further game development in Python and provides a fun and interactive experience for players. With additional features and enhancements, this Breakout game could be expanded into a full-fledged game with multiple levels, power-ups, and more engaging gameplay mechanics.