Paint Program In Python

Introduction
Players are presented with random challenges or prompts, such as drawing specific shapes, using unusual color combinations, or creating abstract patterns. This game not only provides a fun and engaging way to experiment with art but also encourages spontaneity and imagination. Dive into this vibrant world of randomness and let your artistic instincts guide you through each unpredictable challenge!
Coding a Paint Program in Python
Creating a paint program in Python offers several valuable benefits. Firstly, it provides hands-on experience with graphical programming and user interface design, enhancing your understanding of how to manipulate pixels and handle real-time user interactions.
Utilizing libraries like Pygame, you gain practical skills in managing drawing surfaces, event handling, and implementing interactive features. This project also fosters creativity and problem-solving as you design and implement custom functionalities, such as color picking or brush size adjustments. Overall, building a paint program serves as an engaging way to deepen your programming expertise while creating a fun and functional application.

What You Need To Know
To code a paint program in Python, you’ll need a solid grasp of Python fundamentals, including variables, control flow, and functions.
Familiarity with graphical libraries like Pygame or Pillow is essential for creating and manipulating visual elements. Understanding how to handle user inputs, such as mouse events, will allow you to implement drawing functionalities.
You’ll also need to know how to manage graphical drawing on a canvas, including working with coordinates and colors. Basic knowledge of user interface design will help you set up and manage the graphical window and interactions. Lastly, being able to install and configure the necessary libraries is crucial to get your program running smoothly.

Paint Program With Python (Full Code)
import pygame
import sys

# Initialize Pygame
pygame.init()

# Set up the screen
SCREEN_WIDTH = 800
SCREEN_HEIGHT = 600
screen = pygame.display.set_mode((SCREEN_WIDTH, SCREEN_HEIGHT))
pygame.display.set_caption("Drawing Game")

# Define colors
WHITE = (255, 255, 255)
BLACK = (0, 0, 0)
GREEN = (0, 255, 0)

# Define dot attributes
DOT_SIZE = 10
dot_speed = 10

# Store dot positions in a list
dot_positions = [(SCREEN_WIDTH // 2, SCREEN_HEIGHT // 2)]

# Function to draw the dot
def draw_dot():
    for pos in dot_positions:
        pygame.draw.circle(screen, GREEN, pos, DOT_SIZE // 2)

# Function to handle dot movement
def move_dot(direction):
    global dot_positions

    new_x, new_y = dot_positions[-1]  # Get the last dot position

    if direction == "LEFT":
        new_x -= dot_speed
    elif direction == "RIGHT":
        new_x += dot_speed
    elif direction == "UP":
        new_y -= dot_speed
    elif direction == "DOWN":
        new_y += dot_speed

    # Add new dot position
    dot_positions.append((new_x, new_y))

# Function to delete the last dot
def delete_last_dot():
    global dot_positions
    if len(dot_positions) > 1:  # Ensure there is at least one dot left
        dot_positions.pop()

# Main game loop
clock = pygame.time.Clock()

running = True
pressed_keys = set()
while running:
    for event in pygame.event.get():
        if event.type == pygame.QUIT:
            running = False
            pygame.quit()
            sys.exit()
        elif event.type == pygame.KEYDOWN:
            pressed_keys.add(event.key)
            if event.key == pygame.K_LEFT:
                move_dot("LEFT")
            elif event.key == pygame.K_RIGHT:
                move_dot("RIGHT")
            elif event.key == pygame.K_UP:
                move_dot("UP")
            elif event.key == pygame.K_DOWN:
                move_dot("DOWN")
            elif event.key == pygame.K_r:
                dot_positions = [(SCREEN_WIDTH // 2, SCREEN_HEIGHT // 2)]  # Reset dot positions
            elif event.key == pygame.K_l:
                delete_last_dot()  # Delete the last dot
        elif event.type == pygame.KEYUP:
            pressed_keys.discard(event.key)

    screen.fill(BLACK)

    # Draw the dot
    draw_dot()

    # Check for continuous movement
    for key in pressed_keys:
        if key == pygame.K_LEFT:
            move_dot("LEFT")
        elif key == pygame.K_RIGHT:
            move_dot("RIGHT")
        elif key == pygame.K_UP:
            move_dot("UP")
        elif key == pygame.K_DOWN:
            move_dot("DOWN")

    pygame.display.flip()
    clock.tick(10)
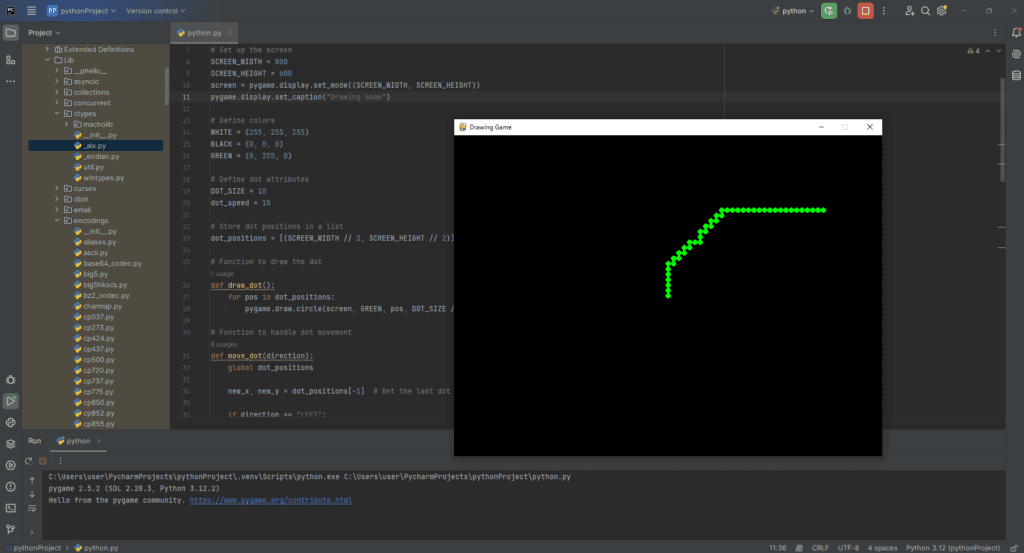
Now you can copy paste the following code on Pycharm and run it. The game will be launched and you can begin to play but the goal is not to play the game, it is to create it!
So i recommand you to try to fully understand how it works by continuing to read this page and then try to add more implementations from your own perspective. Like you can see on the above code, i commented every line of the code so you can have a fully understanding of how things are going on.
Later on, i extracted each part of the code and explain the main goals of each function.
Main Algorithms To Understand
Setting Up The Screen:
To set up the screen in your paint program, you need to initialize a graphical window where users can interact with the application.
import pygame
import sys

# Initialize Pygame
pygame.init()

# Set up the screen
SCREEN_WIDTH = 800
SCREEN_HEIGHT = 600
screen = pygame.display.set_mode((SCREEN_WIDTH, SCREEN_HEIGHT))
pygame.display.set_caption("Jumping Platformer Game")
Begin by importing the necessary libraries, such as Pygame, and then initialize it with pygame.init(). Define the dimensions of your window, such as width and height, and create the display surface using pygame.display.set_mode(), which will be the area where all drawing takes place.
You can also set a title for the window with pygame.display.set_caption() to give your application a recognizable name. This configuration provides the foundational canvas for your paint program, enabling you to render and interact with graphical elements.
Load Images:
To load an image in your paint program using Pygame, we start by importing the library and initializing it with pygame.init().
# Load images
player_img_right = pygame.image.load("player_right.png").convert_alpha()
player_img_left = pygame.image.load("player_left.png").convert_alpha()
player_img_jump = pygame.image.load("player_jump.png").convert_alpha()
background_img = pygame.image.load("background.png").convert()
Use pygame.image.load('path_to_image_file') to load your image file into a Surface object. Replace 'path_to_image_file' with the actual path to your image.
To display the image, use screen.blit(image_surface, (x, y)), where image_surface is the loaded image and (x, y) determines its position on the screen. Finally, update the display with pygame.display.flip() to render the image in your application.
Get Player Image Dimensions:
To get the dimensions of a player image in your paint program, we can use the get_size() method provided by Pygame.
player_width, player_height = player_img_right.get_size()After loading the image into a Surface object (e.g., player_img_right), call player_img_right.get_size() to retrieve a tuple containing the width and height of the image. You can then unpack this tuple into separate variables, player_width and player_height, for easy access.
This method ensures you have the exact dimensions of the player image, which is useful for positioning, scaling, and collision detection within your game.
Player Attributes:
The code snippet initializes player attributes for a game, setting up the player’s position and behavior.
# Player attributes
player_x = SCREEN_WIDTH // 2 - player_width // 2
player_y = SCREEN_HEIGHT - player_height
player_speed = 5
jump_force = -17
gravity = 0.5
on_ground = True
jumping = False
player_image = player_img_right  # Initially facing right
It positions the player at the horizontal center of the screen (SCREEN_WIDTH // 2 - player_width // 2) and near the bottom of the screen (SCREEN_HEIGHT - player_height). The player_speed determines how fast the player moves, while jump_force controls the initial vertical speed for jumping. gravity is applied to simulate falling over time, and on_ground indicates if the player is currently touching the ground.
The jumping boolean tracks whether the player is in the air due to a jump. Finally, player_image is set to player_img_right, indicating the player is initially facing right.
Function To Draw Player:
The draw_player function is responsible for rendering the player image on the screen.
# Function to draw player
def draw_player():
    screen.blit(player_image, (player_x, player_y))
Inside this function, the screen.blit(player_image, (player_x, player_y)) line draws the player’s image at the specified coordinates (player_x, player_y) on the screen.
The blit method is used to copy the player_image surface onto the screen surface at the given position, effectively displaying the player at the correct location in the game window.
Function To Handle Player Movement:
The move_player function manages the player’s movement and jumping mechanics.
# Function to handle player movement
def move_player():
    global player_x, player_y, on_ground, jumping, jump_force

    keys = pygame.key.get_pressed()
    if keys[pygame.K_LEFT] and player_x > 0:
        player_x -= player_speed
        if player_y + player_height < SCREEN_HEIGHT:
            on_ground = False
    if keys[pygame.K_RIGHT] and player_x < SCREEN_WIDTH - player_width:
        player_x += player_speed
        if player_y + player_height < SCREEN_HEIGHT:
            on_ground = False

    # Jumping mechanic
    if jumping:
        player_y += jump_force
        jump_force += gravity
        if player_y >= SCREEN_HEIGHT - player_height:
            player_y = SCREEN_HEIGHT - player_height
            jump_force = -17
            on_ground = True
            jumping = False
It starts by checking the current state of the keyboard using pygame.key.get_pressed(). If the left arrow key is pressed and the player is not at the left edge, the player’s position (player_x) is adjusted to move left, and the on_ground flag is set to False if the player is in the air.
Similarly, if the right arrow key is pressed and the player is not at the right edge, the player moves right with the player_speed, and on_ground is adjusted accordingly.
Main Loop:
The main game loop handles the core functionality of the game, running continuously to manage events, update the game state, and render the display.
# Main game loop
clock = pygame.time.Clock()

while True:
    # Event handling
    for event in pygame.event.get():
        if event.type == pygame.QUIT:
            pygame.quit()
            sys.exit()
        elif event.type == pygame.KEYDOWN:
            if event.key == pygame.K_SPACE and on_ground:
                jumping = True
                on_ground = False
            elif event.key == pygame.K_LEFT and on_ground:
                player_image = player_img_left
            elif event.key == pygame.K_RIGHT and on_ground:
                player_image = player_img_right

    # Move player
    move_player()

    # Draw background
    screen.blit(background_img, (0, 0))

    # Draw player
    draw_player()

    pygame.display.flip()

    # Set the frame rate
    clock.tick(60)
First, it sets up a clock with pygame.time.Clock() to control the frame rate. Inside the loop, it processes events with pygame.event.get(), handling window closure (pygame.QUIT) to exit the game gracefully and key presses to control the player.
Pressing the spacebar (pygame.K_SPACE) triggers a jump if the player is on the ground, setting the jumping flag and updating on_ground. Arrow key presses (pygame.K_LEFT and pygame.K_RIGHT) change the player’s image based on movement direction, but only when the player is on the ground.

Summary
In conclusion, the game we’ve coded provides a solid foundation for a basic platformer or interactive painting application. We’ve set up a graphical window using Pygame, implemented player movement and jumping mechanics, and integrated basic event handling to manage user inputs.
By allowing the player to move left and right, jump, and interact with the environment, we’ve created an engaging experience. The main game loop continuously processes events, updates the game state, and renders the display, ensuring smooth and responsive gameplay.
This project not only demonstrates fundamental game development concepts but also offers a platform for further enhancement, such as adding more complex features, improving graphics, or expanding gameplay mechanics. With this code, you have a working base that can be built upon to create a more detailed and polished game.


Post Comment